Ansys Settings | Line-to-Line Contact Simulation
AKA Pipe Inside Pipe Contact
Ansys has line-to-line element contact simulation via CONTA176 elements combined with specialized settings of TARGE170 elements. The contact is detected around a radius for the line contact elements, so proper use would be for line body elements representing circular pipes and tubes.
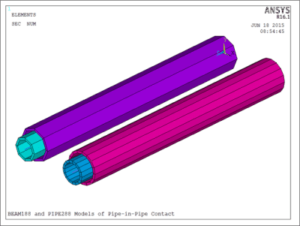
This document notes the specialized use of pipe-in-pipe contact representing a smaller diameter pipe inside a larger diameter pipe. The CONTA176 element can be set with a KEYOPT setting to be intended for parallel pipe contact, or perpendicular pipe contact. The pipe-in-pipe settings employ the parallel pipe assumption. Diameters required for contact are set by REAL constants. Postprocessing can include contact data.
A Model Setup with Parallel Beam-inside-Beam Contact
Although more rare than external contact between beams that are parallel or that cross each other, some user models consider contact between two pipes with one inside the other. Ansys settings for CONTA176 and TARGE170 elements will consider this. The Line-to-Line contact elements only provide for circular shapes, so their principal use would be for pipes, tubes, or perhaps cables in contact with each other. There is another contact element type, CONTA177, which is used for Line-to-Surface contact.
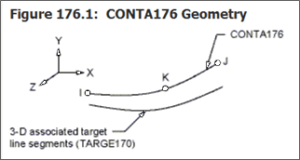
As illustrated in the Help system, the CONTA176 element can be either a straight 2-node element, or a curved 3-node element:
The beam-in-beam configuration is illustrated in the Ansys documentation’s next image:
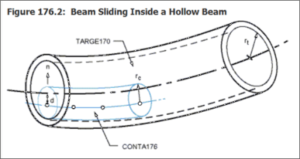
A typical meshing sequence would be to first create the mesh of the beam or pipe elements such as BEAM188, BEAM189, PIPE288 or PIPE289, for the inside and outside pipes, then use the same nodes to create CONTA176 elements for the inner pipe, and TARGE170 elements for the outer pipe.
Real constants for the contact and target element pair indicate the inside radius of the outer pipe (the Target), and the outside radius of the inside pipe (the Contact):

For the case of pipe-inside-pipe contact, the R1 Target Radius value is entered with a negative value, while the R2 Contact radius is entered with a positive value, e.g.:
! REAL constant for the contact/target pair
! Note target radius with minus sign, contact radius with plus sign
! Target radius is inside radius of outer beam, 1.2 with minus sign
! Contact radius is outside radius of inner beam, 1.0 with plus sign
! Pinball 1.3 with minus sign. Larger than gap.
R,3,-1.2,1.0,1, 0.1,0,-1.3
RMORE,0,0,1e+020, 0,1,0
RMORE,0,,, ,,
RMORE,,,1, 0,,
RMORE,,,,,0,
RMORE,0,0,0,0,0
In the above set of commands that create the REAL constant entries for the contact pair, the inner radius of an outer pipe is 1.2 units, entered with a minus sign, and the outside radius of an inner pipe is 1.0 units, entered as positive. Note that the REAL entry for the pinball radius has been entered in the sixth REAL position as -1.3, using a minus sign to signal to Ansys that this pinball radius is an absolute value and not a multiplier on another number. The pinball radius has been entered with a magnitude larger than the outer pipe’s inside radius.
The radius values for the structural pipes employed with the above contacts use the same radius information. It is up to the user to enter it correctly. Here are section example entries for a pair of BEAM188 elements set to use circular cross-section, and for a pair of PIPE288 elements, which automatically have circular cross-section:
BEAM188 Example:
! Inner circular beam — outside radius 1.0
SECTYPE, 1, BEAM, CTUBE, inner, 0
SECOFFSET, CENT
SECDATA,.8,1,0,0,0,0,0,0,0,0,0,0
! Outer circular beam — inside radius 1.2
SECTYPE, 2, BEAM, CTUBE, outer, 0
SECOFFSET, CENT
SECDATA,1.2,1.4,0,0,0,0,0,0,0,0,0,0
Note above that the inner beam has an inside radius of 0.8 units, and an outside radius of 1.0 units. The outer beam has an inside radius of 1.2 units and an outside radius of 1.4 units. Wall thickness for the “pipes” represented by these circular beams is implied by inside and outside diameter values.
The PIPE288 elements section descriptions use diameters, rather than radius values. To have the same net radius values as in the BEAM188 examples above, the following section descriptions would be used with pipe elements:
PIPE288 example:
! Inner pipe, outside diameter 1.0, wall thickness 0.2
SECTYPE,4,PIPE, ,pinsid
SECDATA,2.0,.2,16,0,1,0,0,0, ! 2.0″ diameter, 0.2″ wall
SECOFFSET,0,0,
SECCONTROL,0,
!
! Outer pipe, outside diameter 2.8, wall thickness 0.2
SECTYPE,5,PIPE, ,poutsid
SECDATA,2.8,.2,16,0,1,0,0,0, ! 2.8″ diameter, 0.2″ wall
SECOFFSET,0,0,
SECCONTROL,0,
The number of sectors around the circumference in the commands above has been increased to 16 in this PIPE288 example. Inside diameter is implied by outside diameter and wall thickness. A fundamental difference in PIPE288 versus BEAM188 with a circular section is that the PIPE288 elements take an inside pressure load.
The following images show element types, real constants, and section properties as entered via the interface of Ansys Mechanical APDL for the example presented in this article.
BEAM188 Element Type Used for Circular Pipe Representation
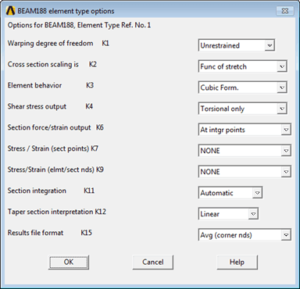
Above, the non-default Element behavior Keyopt(3) setting of “Cubic Form” has been chosen. This is the highest order shape function for this element, and might be chosen with elastic behavior. There should still be at least several elements along the length of a physical pipe.
PIPE288 Element Type
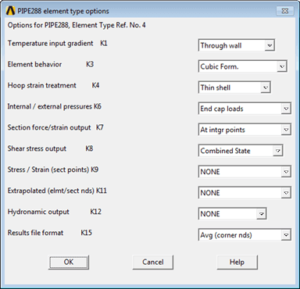
In the PIPE288 settings above, a cubic shape function form has also been chosen.
Section Properties used for the Inside and Outside BEAM188 Pipe Modeling
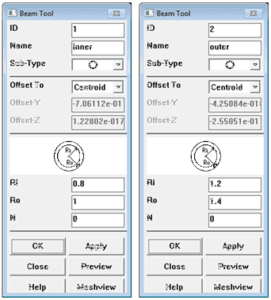
Above, we see entry of the inside and outside radius values for the BEAM188 pipe sections.
Section Properties for Inside and Outside PIPE288 Modeling
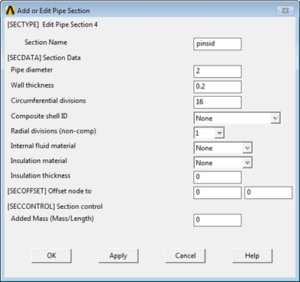
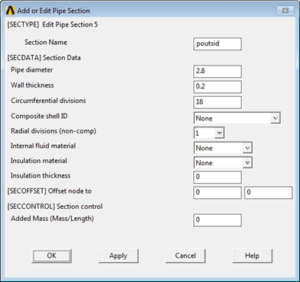
In the figures above, diameters and wall thickness values are entered for pipe section information, rather than radius values.
Contact Element Options for CONTA176 for Line Elements
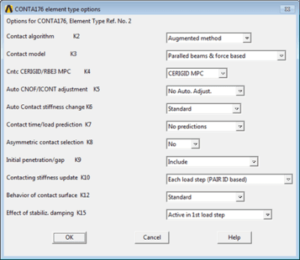
The associated TARGE170 elements have to be set to LINE behavior to represent pipe-inside-pipe modeling:
TSHAP,LINE
The GUI entry for the TSHAP setting for the target element is seen in the Element Attributes dialog box:
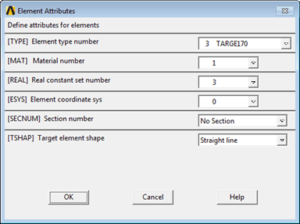
During the element definition, the following options are used for TARGE170. Note the “Low order” selection for Keyopt(1), since this model is not using high-order (midside node) elements:
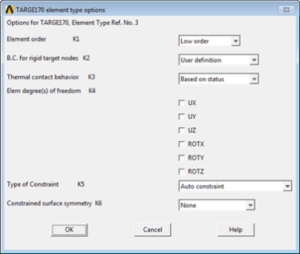
Other entries here have been left at default values.
Contact and Target Element Real Constants for Pipe-in-Pipe
The first dialog box shows the Contact element settings:
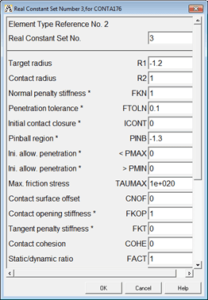
The next dialog box shows the Target element settings, which are a subset of the Real constants shown above. These entries would be redundant if the settings in above have been entered.
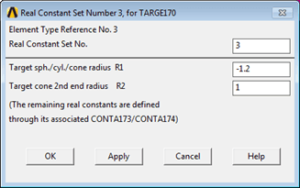
Note the minus sign on the R1 value, implying that for the purpose of contact the inside radius of the outside pipe is 1.2 units. The outside diameter of the inside pipe R2 for the purpose of contact is 1.0 units.
Here is a complete listing of commands that build a simple test model. Only one element is used in each “pipe”. This is not sufficient for proper pipe representation.
fini
/clear,nostart
!
/PREP7
ET,1,BEAM188
KEYOPT,1,3,3 ! cubic shape function along length
!
! Inner circular beam — outside radius 1.0
SECTYPE, 1, BEAM, CTUBE, inner, 0
SECOFFSET, CENT
SECDATA,.8,1,0,0,0,0,0,0,0,0,0,0
!
! Outer circular beam — inside radius 1.2
SECTYPE, 2, BEAM, CTUBE, outer, 0
SECOFFSET, CENT
SECDATA,1.2,1.4,0,0,0,0,0,0,0,0,0,0
!
N,1,0,0,0,,,,
N,2,0,0,20,,,,
N,3,0,0,21,,,,
!
mp,ex,1,30000000
mp,nuxy,1,.3
!
! Inside beam is slightly longer, node 1 to 3
TYPE,1
MAT,1
ESYS,0
SECNUM,1
!
e,1,3
!
! Outside beam is shorter, node 1 to 2
TYPE,1
MAT,1
ESYS,0
SECNUM,2
!
e,1,2
!
! Show the beam elements with cross section visible
/eshape,1
/view,1,1,1,1
eplo
!
! Contact and target elements for line-to-line, tube inside tube
ET,2,CONTA176
ET,3,TARGE170
KEYOPT,2,7,1 ! Bisection if req’d
KEYOPT,2,3,0 ! Parallel beams/pipes
KEYOPT,3,1,0 ! Low Order
KEYOPT,3,2,1 ! BC specified by user
!
! REAL constant for the contact/target pair
! Note target radius with minus sign, contact radius with plus sign
! Target radius is inside radius of outer beam, 1.2 with minus sign
! Contact radius is outside radius of inner beam, 1.0 with plus sign
! Pinball 1.3 with minus sign. Larger than gap.
!
R,3,-1.2,1,1, 0.1,0,-1.3
RMORE,0,0,1e+020, 0,1,0
RMORE,0,,, ,,
RMORE,,,1, 0,,
RMORE,,,,,0,
RMORE,0,0,0,0,0
!
! Create contact element with nodes of inside beam (tube)
real,3
type,2
e,1,3
!
! Create target elements with nodes of outside beam (tube)
! Declear to be a target element of shape LINE
type,3
tshap,line
e,1,2
!
! PIPE288 example
ET,4,PIPE288
!*
KEYOPT,4,3,3 ! cubic shape function
KEYOPT,4,4,1 ! thin pipe theory
KEYOPT,4,6,0 ! end cap loads
!
! This example uses 16 segments around pipe circumference
!
SECTYPE,4,PIPE, ,pinsid
SECDATA,2.0,.2,16,0,1,0,0,0, ! 2.0″ diameter, 0.2″ wall
SECOFFSET,0,0,
SECCONTROL,0,
!
SECTYPE,5,PIPE, ,poutsid
SECDATA,2.8,.2,16,0,1,0,0,0, ! 2.4″ diameter, 0.2″ wall
SECOFFSET,0,0,
SECCONTROL,0,
!
N,4,5,0,0,,,,
N,5,5,0,20,,,,
N,6,5,0,21,,,,
!
TYPE,4
MAT,1
REAL,0
ESYS,0
SECNUM,4
E,4,6
!
SECNUM,5
E,4,5
!
! Create contact element with nodes of inside pipe288
real,3
type,2
e,4,6
! Create target elements with nodes of outside pipe288
! Declear to be a target element of shape LINE
type,3
tshap,line
e,4,5
!
fini
!
/solu
! Lots of substeps, keep 20 substeps for review
NSUBST,100,1000,10
OUTRES,ERASE
OUTRES,ALL,-20
!
! UY applied to end of inside beam (tube) and pipe
! Constrain far end of both beams and pipes
!
! Circular beam BEAM188 pair
d,1,all,0
d,3,ux,0
d,3,uy,-0.4 ! move near end down
!
! PIPE288 pair
d,4,all,0
d,6,ux,0
d,6,uy,-0.4 ! move near end down
!
allsel
solve
fini
!
/post1
allsel
/eshape,1 ! view cross-section
/efacet,4 ! more detail in plots
/dscale,1,1
plnsol,u,y ! contour plot UY deformation
!
esel,s,ename,,176
!
ETABLE,contstat,CONT,STAT ! status
ETABLE,contpene,CONT,PENE ! penetration
ETABLE,contgap,CONT,GAP ! gap
ETABLE,contpres,CONT,PRES ! pressure
PRETAB,CONTSTAT,CONTPENE,CONTGAP,CONTPRES
!
ETABLE,NMISC41,NMISC,41 ! HIGHEST STATUS IN ELEMENT
PRETAB,CONTSTAT,NMISC41
!
etable,smisc1,smisc,1
etable,smisc2,smisc,2
PRETAB,SMISC1,SMISC2
plls,smisc1,smisc2
!
allsel
plnsol,u,y
/wait,1
! Animate the deformation over the results
ANDATA,0.1, ,2,0,0,1,1,1
Users should stop the modeling pipe animation that plays when the above command set is run.
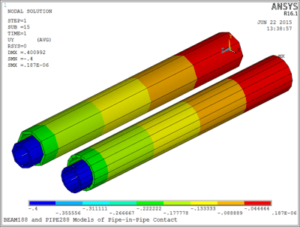
In Figure 14 below, the UY displacement of the pipes is plotted by the above set of commands. The inner pipes are moved downward at the left hand end, eventually touching the outer pipes, and moving them downward, too. All 4 pipes are fixed at the right hand end, with zero displacement.
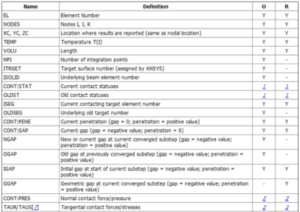
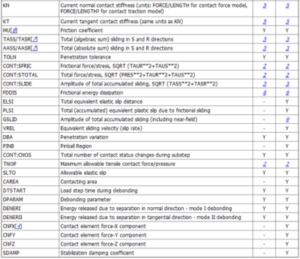
The Help system lists outputs that are available giving contact results information:
Conclusions | Modeling Pipe inside Pipe Contact
Pipes and tubes can be represented with BEAM188 or with PIPE288 elements. High-order elements BEAM189 and PIPE289 can also be used to take advantage of the midside node in curved pipe modeling. The PIPE288 and PIPE289 elements have the advantage of supporting internal pressure. (Users should also note the availability of ELBOW290 elements for more complex models.)
Contact between pipe elements is supported by CONTA176 line contact elements paired with the “line” setting for TARGE170 elements. REAL constants must be provided to describe the pipe radius values employed in the description of the piping elements, and entry of correct values is up to the user. Pipe contact elements can be used for parallel pipes and for crossed pipes, according to a KEYOPT setting for the CONTA176 elements. A specialized use of the pipe contact elements supports pipe-in-pipe contact, with the entry of the target element radius provided with a minus sign, and a sufficiently large pinball radius.
This article presents a listing of concepts used in pipe-in-pipe models, and provides a simplified example.
- For Support on performing ‘EKILL‘ in Workbench
- APDL Command Objects post-Spectral Analysis
- For Separating DB Database Files from RST Files
- Measuring Geometric Rotation in Mechanical WB
- CAD Geometry Deformation Plasticity
- To learn more about our Failure Analysis Services

