Ansys Mechanical Application Workbench can produce animations of results. These give users good insight on model behavior. Animations play in the graphics window, which is good for immediate use. Workbench Mechanical can also generate animation files with the AVI extension, for later use.
Immediately played animations in the graphics window play back a chosen number of frames in a specified time duration, while AVI animation files generated by Workbench contain the requested number of frames, but play back at 15 frames per second. If the graphics window is sized to be large and many video frames are requested, Workbench may not generate the full AVI file (observation based on experience—nothing official). Actions to achieve desired animation files are discussed here. Some methods involve the use of free software tools that can be downloaded. Installation requires permission of IT departments. Free third-party tools are of a “use at your own risk” nature—this is not an endorsement.
After Workbench model solves a static or dynamic model, animations can be generated. Below the Graphics Window, an animation creation tool is available in the Graph tab as shown in Figure 2. A result of interest can be selected for plotting in the Graphics Window, and then can be animated.
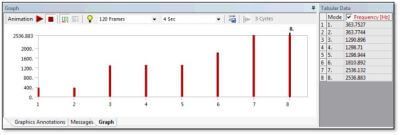
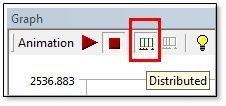
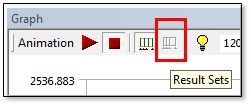
Animations can be created (1) over equally distributed time points, or (2) at saved results sets in the results file:
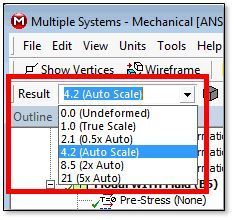
User experience is that with larger models and requests for large numbers of animation frames, Workbench Mechanical does not always successfully generate a complete AVI animation file. Model size, large graphics windows, and many frames in the animation can affect this.

Note that when Workbench Mechanical generates an AVI file on the hard drive, the AVI file created plays back at 15 frames per second, regardless of the time length setting as in Figure 5.
For a higher success rate when using Workbench Mechanical to generate animation files with the AVI extension:
Experience suggests that the “fresh start” of Workbench Mechanical just after it is re-opened has a better success rate when generating animation AVI files, even if the animation file is to contain many frames. Generating an animation in this way still produces some pixilation in the appearance of objects in the video, presumably because of the rather basic codec that Workbench Mechanical is using for the video file. The videos produced all play back at 15 frames per second, although free 3rd party software (e.g. VirtualDub) can process the resulting video to play back at other frame rates.
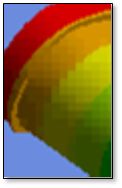
The AVI files from Workbench Mechanical are not highly compressed, and users may find that free 3rd party software (e.g. HandBrake) can generate new animation files with substantially better compression. Users will need to be aware of end-user capabilities for playing back video files before choosing a codec for processing video files. When in doubt, consider WMV. Users could employ Windows Movie Maker or Windows Live Movie Maker to generate WMV video files for playback with Windows operating systems, if HyperCam does not offer to generate WMV. Alternatively, simply re-compress Workbench Mechanical’s AVI files into a ZIP file for email or storage. Limitations of AVI video files generated by Workbench Mechanical include the use of 15 frames per second, as well as a video codec that is not highly compressed, and that generates image frames with noticeable pixilation, as illustrated in the magnified image fragment shown in the figure below:
Here is selected information on the contents of a video file generated by Workbench Mechanical. Note that the video uses the codec “Microsoft Video 1” and plays at “15.000 fps”:
Format: AVI
Format/Info: Audio Video Interleave
Overall bit rate: 8 352 Kbps
Video
ID: 0
Format: MS Video
Codec ID: CRAM
Codec ID/Info: Microsoft Video 1
Duration: 6s 667ms
Bit rate: 8 347 Kbps
Width: 852 pixels
Height: 468 pixels
Display aspect ratio: 16:9
Frame rate: 15.000 fps
In comparison to the AVI video files, animations playing in the graphics window of Workbench Mechanical are “pixel perfect” and play their specified number of frames in the specified time interval, assuming model size and frame rate do not overwhelm a computer’s graphics card. 20 frames in 2 seconds yields in 10 frame-per-second playback.
Here are example settings that generate 120 frames over 4 seconds, for a smooth 30 frames-per-second animation in the Graphics Window:

To get output video files with a more perfect appearance, a freeware tool such as HyperCam can capture the animation that plays in the graphics window of Workbench Mechanical, avoiding the pixilation seen in AVI files generated by Workbench Mechanical, and sampling the screen at a specified frame rate.
HyperCam 2 is free software that captures a video of a user’s interactive use of a computer screen. It can be downloaded for free from sources such as CNET, or from the developer:
Users may prefer to use the 64-bit version of HyperCam on a 64-bit operating system such as XP, Vista, or Windows 7. If downloading from CNET, for simplicity just use the Direct Download Link. The installation file “HC2Setup64.exe”can be saved to the hard drive, and HyperCam can then be installed. This may require IT permission, depending on how the user accounts were defined.
When HyperCam runs, a screen region or window can be chosen for the recording session, a format for the stored AVI video file should be chosen, and a user starts, pauses and stops the recording. To add to the possibilities for video file saved formats, users may wish to add a codec pack to the Windows operating system. Brief experimentation with 64-bit Windows XP shows that installation of the freeware K Lite Codec Pack plus the K Lite Codec Pack x64 can provide increased video format support on a user’s computer.
Note: During HyperCam, K Lite and other installations, users may want to opt out of toolbar installation.
The above links may change as updated software versions become available.
When HyperCam starts, the following dialog box is seen. In the “Screen Area” tab, a user chooses Select Region (choosing a rectangular area by typing in screen coordinates with 0.0 at the upper left corner or with the “Select Region” button and using the mouse), or Select Window (choosing a Window for video file capture).
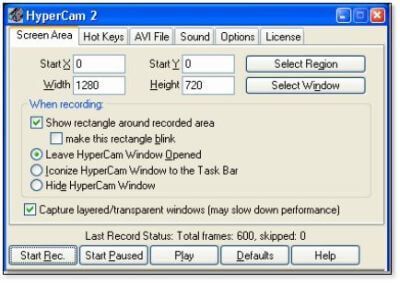
In addition, when capturing or animating an FEA model, it is helpful to click the “Show rectangle” checkbox in the “Screen Area” tab. Users may prefer “Hide HyperCam Window” so the F2 and F3 keys can control recording, as illustrated below in the second “Hot Keys” tab:
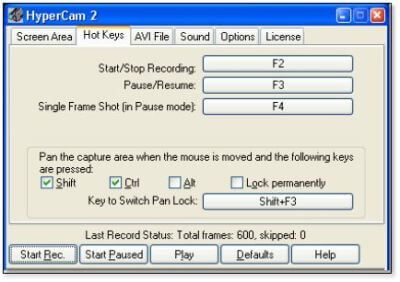
Note that if F2 is employed repeatedly, multiple AVI files can be stored in the same location.
The third “AVI File” tab is used to choose the location where the resulting AVI file will be stored and to assign its name. The “Add sequential number” checkbox can be used to get multiple recorded video files to have sequential numbering. In this tab, there are many other settings to consider:
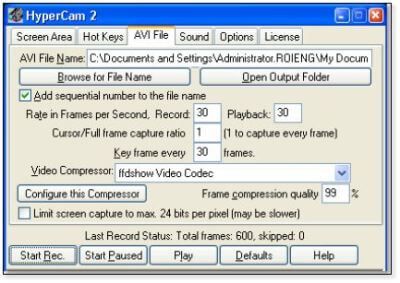
While animating an FEA Model, users should consider the “Frames per Second” choices in the “AVI File” tab. The example above is using 30 frames per second (record and playback). Differences in “Record” and “Playback” values could be used to speed up or slow down the resulting video. When used to record Workbench Mechanical animations playing in the Graphics Window, the Record frame rate should match that chosen to run the animation in Workbench Mechanical. Playback speed in the saved animation file could be the same, slower or faster.
Note that the recorder captures the cursor—users should keep the Graphics Window uncovered while a pass through the animation is being recorded.
For some choices of “Video Compressor”, the “Key frame every” setting will affect the size and quality of the resulting video file. Values might range from a small integer to 100 or more. A value of 30 may be typical for ordinary animation capture, but the requirement depends on the video codec. The “Video Compressor” choice is important choosing the codec and controlling the quality of the resulting animation file. A very high quality recording may be desired when capturing FEA animations. Video can be compressed later by other software.

With the K-Lite codecs installed, the “ffdshow Video Codec” entry in the above drop-down list of Video Compressors becomes available, and can generate better results than HyperCam’s default “Auto Select – Strongly Recommended”. The “Configure this Compressor” button in Figure 11 details the settings. With ffdshow, the following window appears, with “Encoder” choices affected by the codec packs installed on the computer:
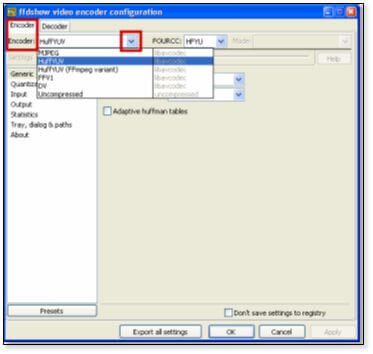
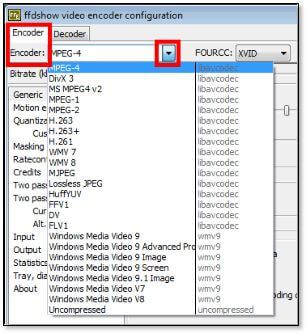

If very high quality recordings are desired, the lossless “HuffYUV” video codec choice illustrated above, will save an exact video copy, while compressing to a much smaller file size than an “Uncompressed” choice. The “HuffYUV” codec choice was found to work better with VirtualDub editing than the “HuffYUV FFmpeg variant” choice. Other settings were left as-is during testing.
To aid VirtualDub software in editing work with lossless compression with HuffYUV, users may want to go into “ffdshow video encoder configuration” to enable the HuffYUV decoder:

With Workbench set up to run an animation and HyperCam running, users can indicate the Graphics Window of Workbench Mechanical for capture, start recording, run the animation, and stop the recording. If the Workbench Mechanical animation is playing at a slow frames-per-second rate, then starting and stopping the HyperCam recording at the right times becomes easy—the video file can be set to play back at another frames-per-second rate in the “AVI File” tab shown in Figure 11. Recording can be initiated and controlled by using the F2 and F3 “Hot Keys” as on the second tab of the HyperCam window, or with buttons across the bottom of the HyperCam window:
![]()
Once the video has been recorded, the above Play button can run the video file immediately. The choice of video player can be tweaked if desired. HyperCam remembers its settings when the animating an FEA Model session is closed out.
Users should remember that the animation frames per second in Workbench Mechanical should match the frames per second at which HyperCam captures its recording, and that recording is easier to control at a slow frame rate.
Workbench can generate animations for immediate watching in the Graphics Window, with user control over the frames used in the animation. In addition, the time duration of one pass through the animation, and the Graphics Window size. Objects in the animation can be panned and rotated during animation playback. After animating an FEA Model, the animations can be stored in an AVI format, although playback is at 15 frames per second, and some pixilation of the images will be seen.
High quality animations that play in the Graphics Window can be captured by the third-party free software tool HyperCam. This document has given a brief outline on how animating an FEA model can be readily achieved in Workbench for mechanical engineers. For more on Ansys FEA Software or Consulting/Technical support, please click here.
Several free third party software tools have been mentioned. This document is not an endorsement of these tools, and they are of a “use at your own risk” nature. If downloaded, they should be obtained from “clean” sources, and checked by security software. Users may require IT permission and administrator privileges to install the software.
The latest Ansys Software releases to support with Longitudinal Damping and Preload
Ansys Mechanical Workbench is a top-tier finite element solver with capabilities to enhance your modeling in the areas of structural, thermal, acoustical, transient, and nonlinear behavior.
Ansys LS-DYNA simulates the response of materials to short duration severe loading. Today, it is the single most used explicit dynamics simulation program worldwide. Best suited for highly technical users.
Ansys EnSight is the market leader for data visualization. Its post-processing tool includes models with more than hundreds of millions of cells, providing engineers with insights unavailable elsewhere.
Ansys Motor-CAD is a specialized electric machine design tool that allows for quick multiphysics simulation over the entire torque-speed working range.
Ansys HFSS simulates 3-Dimensional full-wave electromagnetic fields for accurate and rapid design of high-frequency and high-speed electronic components.
Gain quick, accurate electronic hardware life predictions with Ansys Sherlock, the only PoF (Reliability Physics/Physics of Failure) software that provides insight at each the system, board, and component levels.
A comprehensive solution for designers, engineers, and analysts that spans the full workflow, from design for additive manufacturing (DfAM) to validation, process simulation, and material exploration
Component-level and system-level simulations are provided by the extensive range of photonics simulation to improve performance, lower the price of physical prototyping, and shorten time-to-market.
Ansys Icepak provides specialized electronic cooling solutions that utilize the industry leading CFD solver for T&F flow analyses of integrated circuits, PCBs and electronics.